Using Posit Connect to implement dynamic user identity for data governance in published apps

For just a moment, close your eyes and imagine that you work on a data science team analyzing loan records (you don’t actually have to close your eyes, and you don’t actually have to analyze loan data, I promise). The loan dataset exists in some external platform like Snowflake or Databricks Unity Catalog, and your team has created an interactive Shiny for Python app that can query that external platform to provide a useful dashboard interface for viewing and filtering the data.
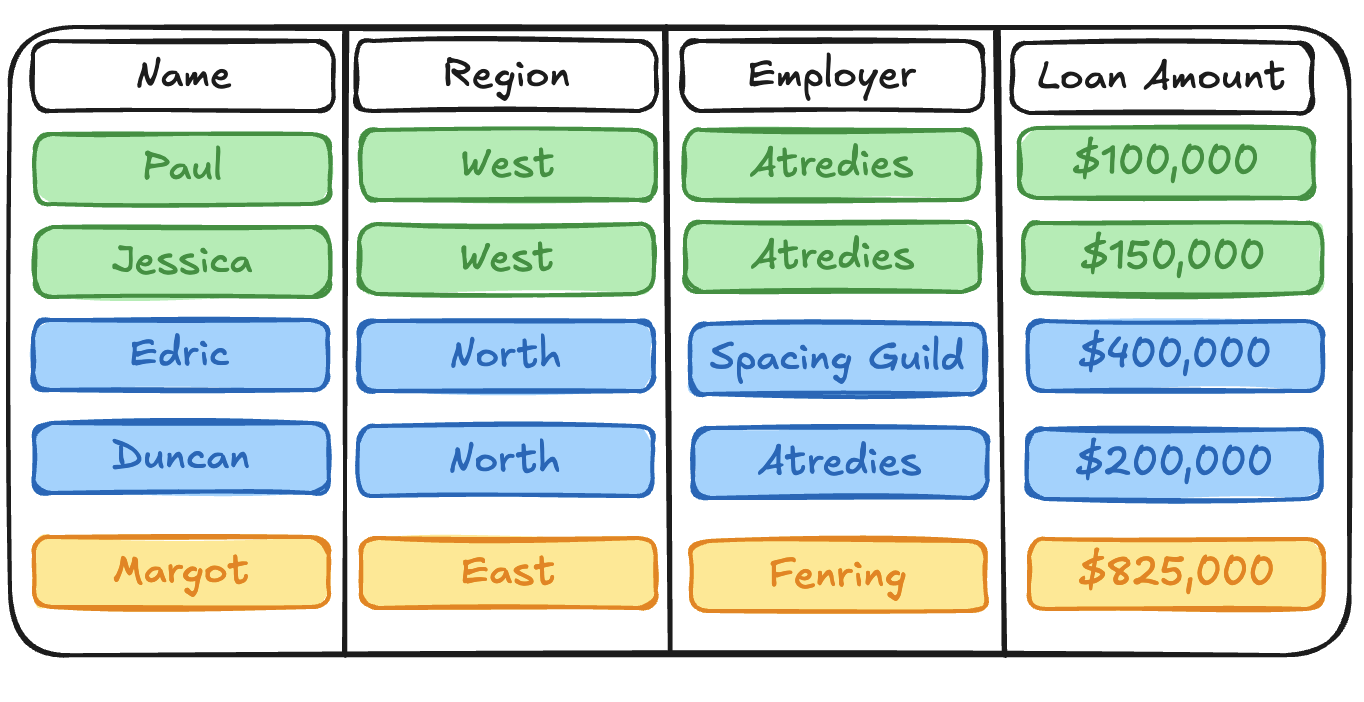
The loan dataset itself is pretty simple. Each row record represents a loan, and each loan record contains information about the:
Nameof the person who applied for the loan.Regionwhere the application occurred.1Employerof the loanee.Loan Amountin USD.
While the loan dataset itself is pretty simple, there are some complicated data access problems that your team encounters regularly:
The
Employercolumn contains Personally Identifiable Information (PII). Your organization has strict security requirements that control PII access. TheEmployercolumn should only be visible to data scientists with both an immediate need to view the data as part of their work, and explicit elevated privileges within your organization. Everyone else on your team should not have access to this data.Each data scientist on your team is focused on a different
Regionof the dataset, and analyses should not cross geographic boundaries.
In short: there are many data scientists on your team looking at different slices of the loan dataset simultaneously. Each individual has different restrictions around what they can access and unique expectations regarding what data is relevant to their work.
How do you manage this complexity within your interactive Shiny app? How do you ensure that the underlying data is both secured against unrestricted access, and easily available for your teammates to work productively?
Unsurprisingly, this post proposes a solution!
We’ll be talking about a new feature in Connect called OAuth integrations, which leverages federated data access controls in external data platforms like Snowflake and Databricks to help data science teams manage inherently sticky data access problems like the one I described above.
I’m very excited to talk about this feature - it opens up so many new avenues for building and sharing powerful data science applications that help teams do their jobs effectively. But I’m getting ahead of myself.
By the end of this post, I hope I’ll have answered the following questions for you:
- What are OAuth integrations in Posit Connect?
- What types of problems do OAuth integrations solve?
- How do OAuth integrations work?
- Where do you get started if you want to start experimenting with OAuth integrations on your own?
With that long-winded introduction out of the way, let’s get started!
What are OAuth integrations?
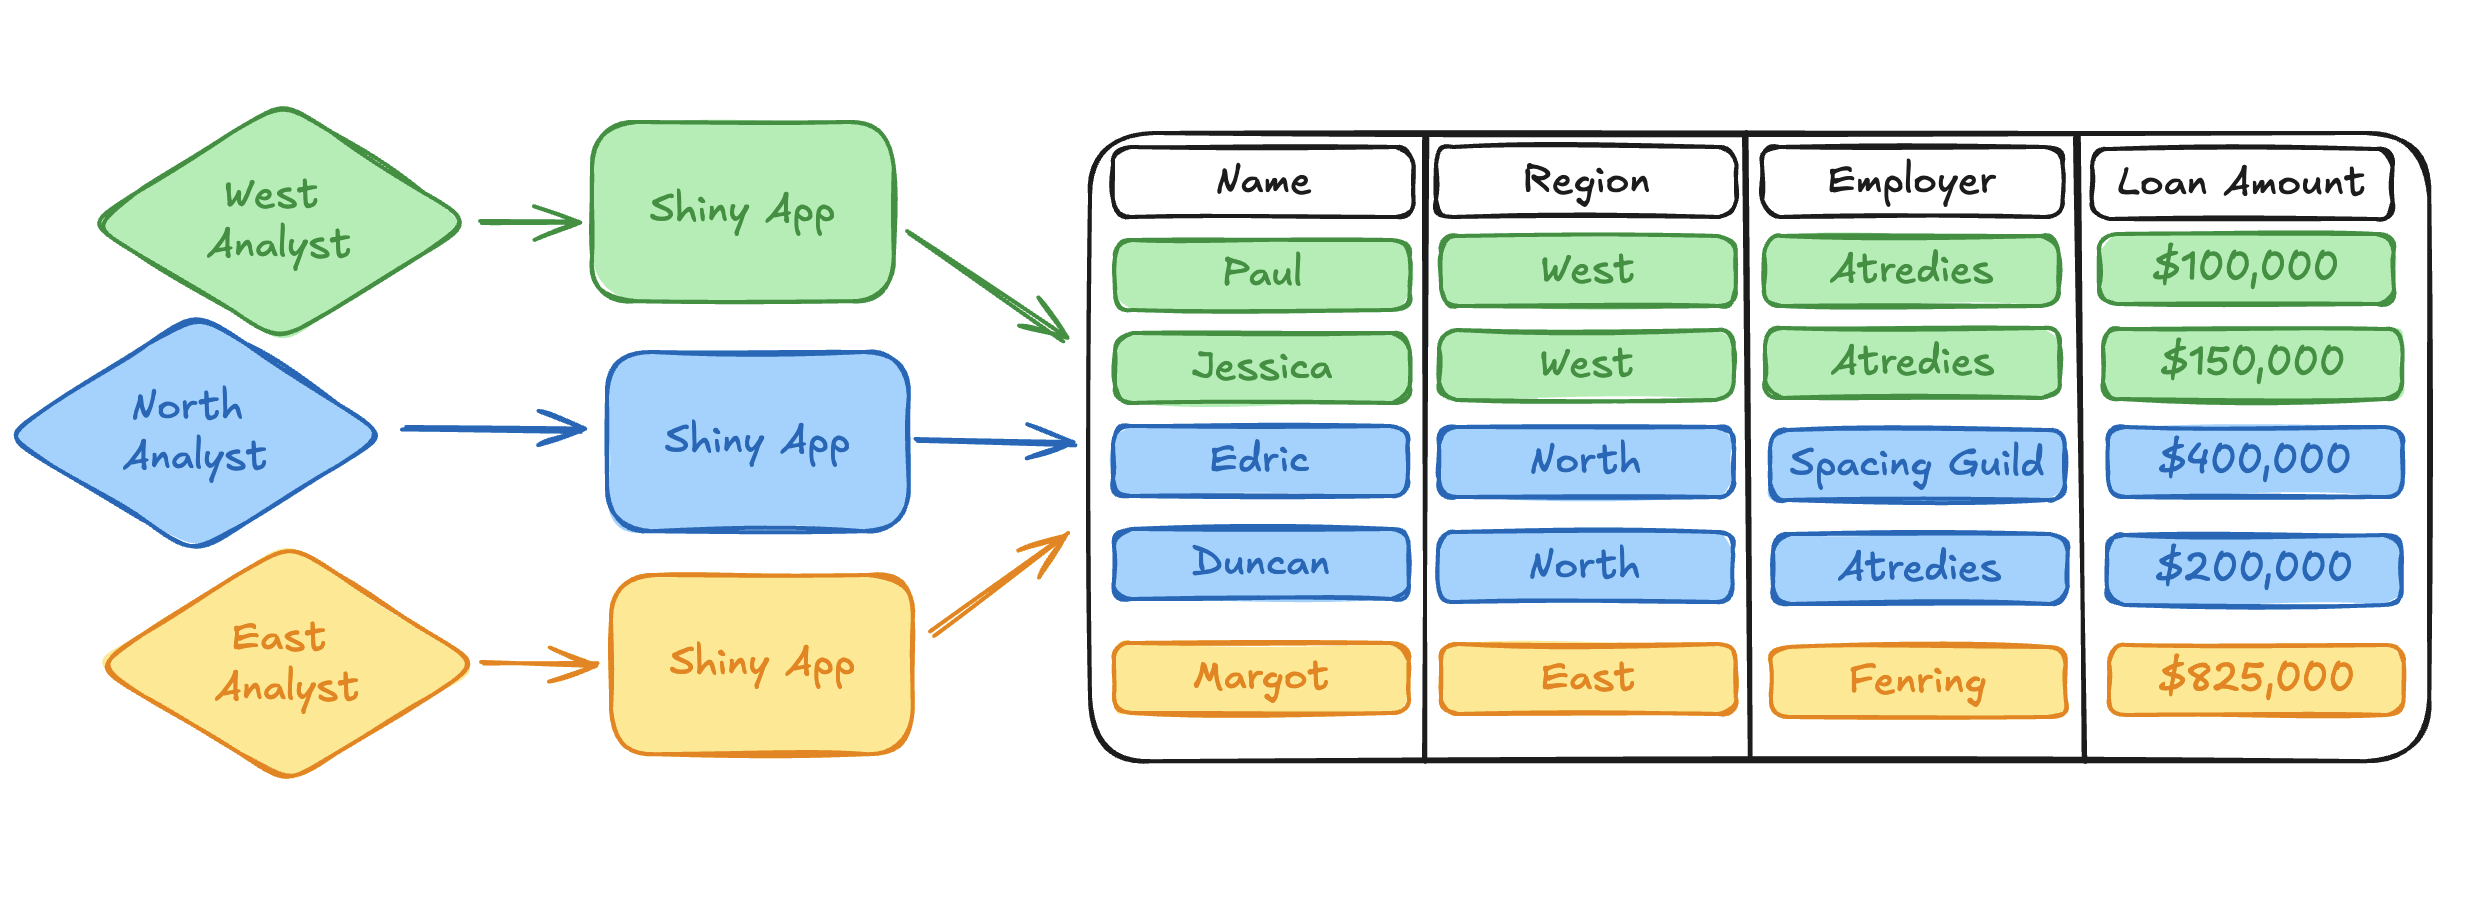
Previously, if you wanted to publish an interactive app to Connect that pulled data out of an external platform like Snowflake or Databricks, the app could only use a single, static identity. This identity may have been the credentials of the app publisher, or it may have been a machine-to-machine service account that represented the identity of the content itself. It would commonly be stored in an environment variable that the app referenced when authenticating against the external platform.
This approach quickly becomes convoluted when we encounter data access problems like the ones described above. One common strategy was to publish many instances of the same app with different service account identities. Access to a specific published app instance would then be controlled through access control lists (ACLs) in Connect. In this non-ideal scenario, the content owner (publisher) is responsible for restricting app access to viewers who have the same external permissions as a given service account.
Not only are these workflows clunky and tedious, but they also push the onus of responsibility for secure data access into the many applications that are querying the external data platform. This requires wasteful replication of work for security teams, makes changes difficult to propagate, increases the complexity of observability and auditing, and ultimately takes data scientists away from the real work they are trying to accomplish with their published applications.
OAuth integrations are a direct solution to the less-than-stellar workarounds required to solve complex data access problems. Simply put, an OAuth integration tells Connect how to communicate with external OAuth 2.0 applications. Through an OAuth integration, Connect can request and curate the OAuth credentials of viewers who interact with published content.2 Once Connect has the OAuth credentials of a user, published content can request those credentials from Connect and use them to query the external data platform on behalf of the content viewer.
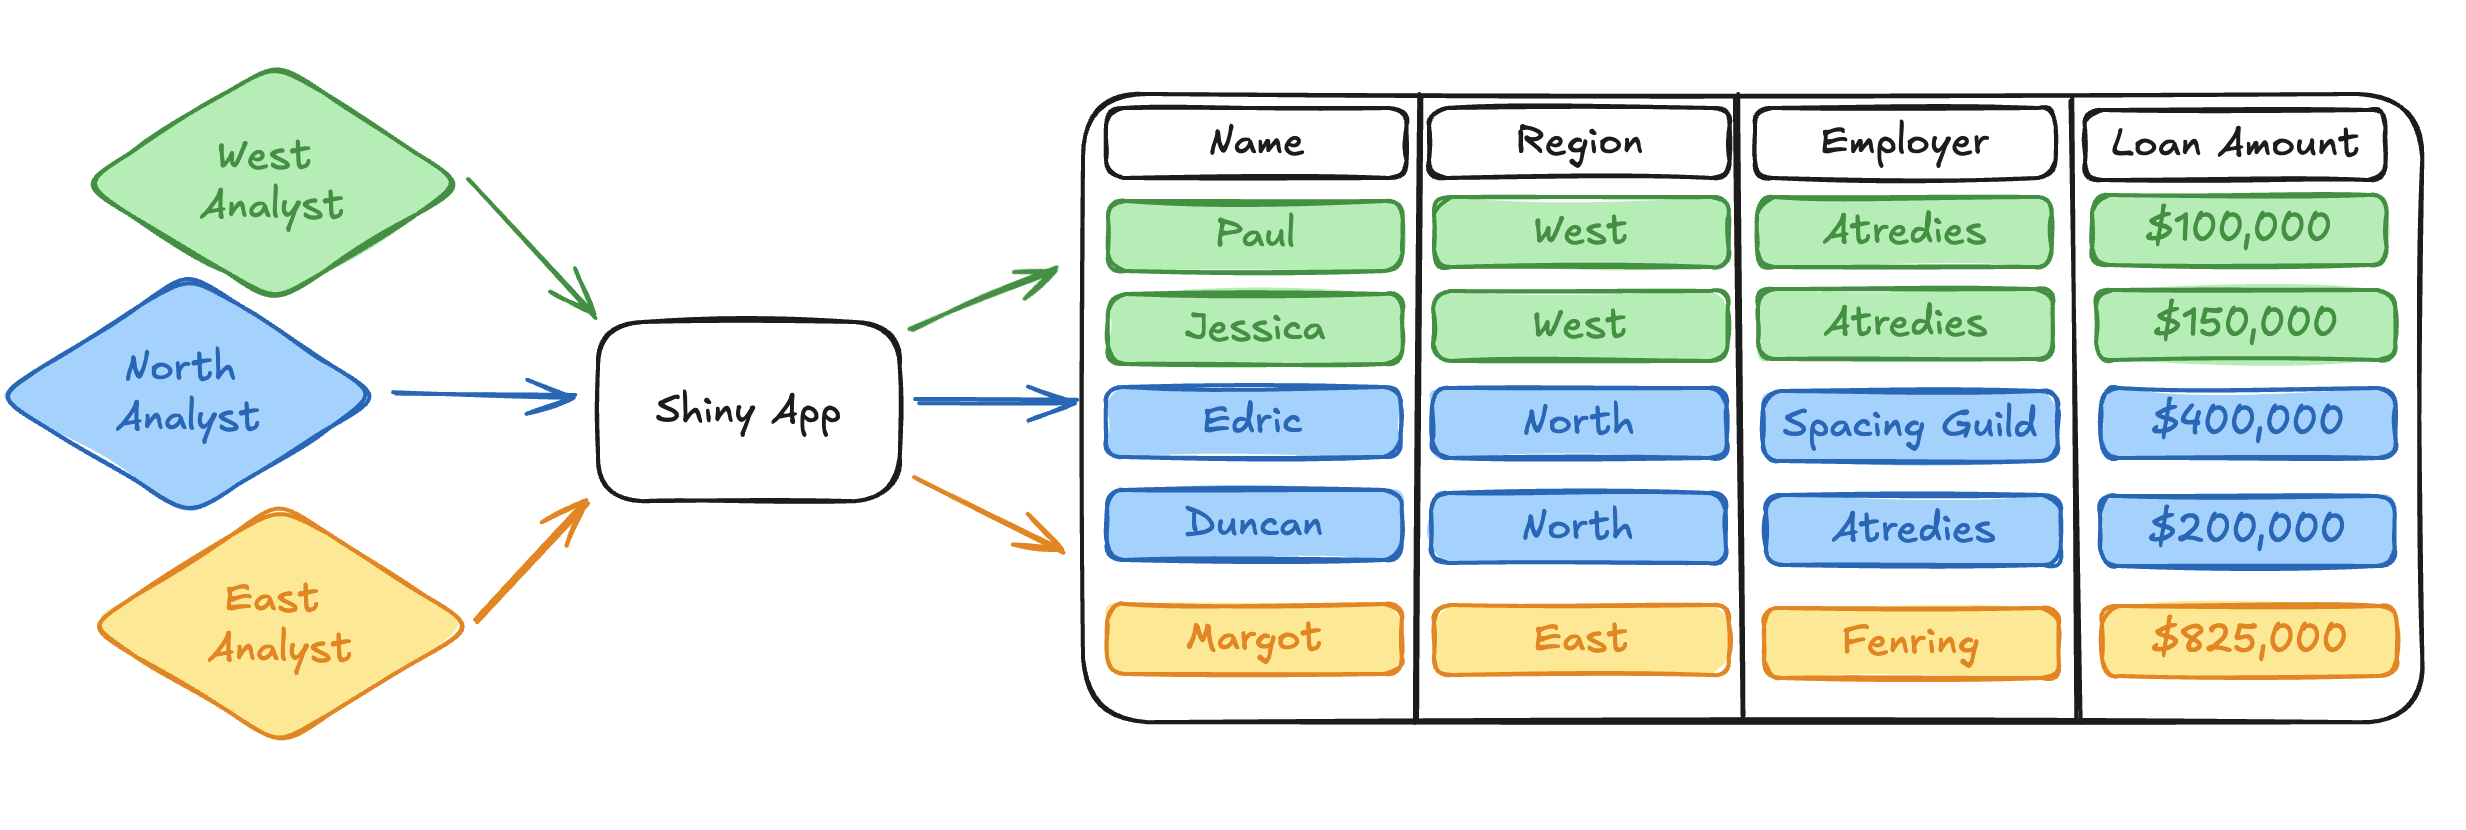
Importantly, this means that a single interactive app can dynamically query for data using the identity of the viewer, rather than relying on static service account credentials when querying data from an external platform. One deployment can now serve many different user personas while transparently relying on the external platform to manage the permissions and restrictions associated with that viewer.
So, we know we can use the OAuth integrations feature to move away from static service account identities and dynamically query external resources with the identity of the app viewer. Great! Let’s keep going and talk a bit about what we can then actually do with these user identities to make our data accessing lives so much easier.
What types of problems do OAuth integrations solve?
Many external data platforms, like Snowflake and Databricks, support the implementation of fine-grained access controls directly above the data source at the row and column level. This means that it is possible to implement rigorous data access controls in a single, centralized location.
Because of this, once we transition the access paradigm from static application identities to using dynamic viewer identities, we can start doing all sorts of cool things.
For example, we can ensure that our analyst responsible for the East region only receives East data when they query the loan dataset. We don’t have to worry about implementing the correct filter in the query logic of the published app because we can instead implement a Row Filter in the data source.
The way that a row filter is implemented will differ by external platform, but the core idea is to implement a Boolean filter that determines if a row could potentially be returned to a viewer prior to other filters being applied by the query itself.
For example, we could check the identity of the requesting viewer and only return rows with regions relevant to their work. The following snippets illustrate how an East region row filter could easily be implemented in both Snowflake and Databricks.
Note
While this is pseudo-code written against our mock loan dataset, both Snowflake and Databricks provide excellent documentation on how to set up row-level access controls against real data.
CREATE OR REPLACE ROW ACCESS POLICY row_filter
AS (region varchar) RETURNS BOOLEAN ->
  "East Analyst" = CURRENT_USER()
      AND "East" = region
;IF(current_user() == "East Analyst", true, Region == "East")Once we’ve applied a row filter like the one above, our Python app doesn’t need to worry about filtering the query by region. It simply passes along the user identity and relies on the row filter to ensure the correct data is returned to the analyst.
We’ll hand-wave a bit here around how the external platform expects you to write and execute data queries, but we can look at a pseudo-code Python snippet that illustrates the general pattern:
# Query executes using the identity of the user.
user_identity = get_user_identity()
with sql.connect(user_identity) as connection:
    with connection.cursor() as cursor:
        # The app query doesn't need to know how to filter by region.
        # Our row filter ensures that the correct region of data is
        # returned to the requesting user.
        cursor.execute("SELECT * FROM loans")
        rows = cursor.fetchall()
        print(rows)
Note that this query calls a get_user_identity() function to capture who is interacting with the app. We’ll put a pin in this function and show how to implement this behavior towards the end of this post. For now, assume that get_user_identity() returns what you’d expect: credentials that identify the user interacting with the app.
If the “East Analyst” user were to run the above query, our row filter would implicitly restrict the returned dataset to just the East region:
# East Analyst only sees East Region data
('Margot', 'East', 'Fenring', 825000)
Similarly, we can implement a column mask to restrict PII access. Let’s say that only the “North Analyst” user needs to access employment information for their project. Everyone else on your team either does not have a need to view that data, or doesn’t have permission to access it.
We can write a function in Snowflake or Databricks that masks PII for everyone except the “North Analyst” user:
CREATE MASKING POLICY column_mask AS (x string) RETURNS string ->
  CASE
    WHEN CURRENT_USER() IN ("North Analyst") THEN x
    ELSE "***"
  END;
CASE WHEN current_user() != "North Analyst" THEN "***" ELSE x ENDNote
Once again, if you want to move beyond a pseudo-code example and learn how to implement column-level access controls against real data, Snowflake and Databricks have fantastic documentation to get you started!
For simplicity, our row filter above only restricts the East region, but we could easily implement similar restrictions to ensure the “North Analyst” only sees the North region. Assuming we implemented similar row filtering across all regions in our dataset, the same Python query above would return employment information to the “North Analyst”:
# North analyst gets employment information
('Edric', 'North', 'Spacing Guild', 400000)
('Duncan', 'North', 'Atredies', 200000)
The “East Analyst” user, on the other hand, would receive redacted employment data from the same query:
# East analyst cannot see PII
('Margot', 'East', '***', 825000)
Synthesizing fine-grained access controls like the ones we set up above with dynamic user identities provided through OAuth integrations in Connect, we observe a really, really powerful pattern. It’s important to take a second here and reflect on how awesome this is.
Using a single application deployed to Connect, we can support many different users who have dramatically different usage patterns and access restrictions. Our app doesn’t have to make any assumptions about what those access patterns are at all. There is no convoluted, difficult-to-understand application logic to make sure data restrictions are respected. The app simply queries for the dataset the same way for each user. All of our access control restrictions are defined in a single curated location, which is easy to review and audit, and any updates to our access control definitions will transparently propagate to our interactive app without any code changes to the published content.
I don’t know about you, but I think this is really cool. So cool, in fact, that I wanted to write a blog post about it!
How does Connect fit in here?
I realize that, for a blog post specifically about a new feature in Connect, the details about what this actually looks like in Connect and how to use it have been pretty sparse so far. Have no fear! I wanted to lay out the implications of what OAuth integrations enable in Connect and explain why I’m so excited about it first. The “why” requires much more context and explanation than the “how.”
Thankfully, it’s very easy to get set up with this feature and begin using it in your own projects!
Before you can get started, your Connect administrator will need to configure the integration. This essentially requires providing Connect with the information it needs to communicate with an external OAuth application. The Connect Admin Guide provides step-by-step instructions on how to do this for different data platforms.
Once the integration is set up by the Connect administrator, content can be associated with the integration. This means that Connect can direct viewers who interact with the content through a login flow that provides Connect with their OAuth credentials. The Connect User Guide provides examples of how to do this in the Connect dashboard.
The core of the work needed to use this feature, beyond the configuration laid out in the guides above, is writing content so that it queries Connect for a user’s OAuth credentials. This is where we finally come back to the get_user_identity function we noted in our example Python SQL code above. Connect provides the dynamic viewer identity through a Server API Endpoint, which is easily accessible with the Posit SDK for Python or from R using the connectapi package.
The full details of how to acquire a user’s OAuth credentials from Connect are laid out in the Connect User Guide, but the following Python snippet shows how it can be done in just a few lines of code:
from posit import connect
from shiny.express import render, session

# Initialize Python SDK Client for Connect
client = connect.Client()

@render.text
def get_user_identity():
    # Read the user-session-token header (set by Connect for interactive content)
    user_session_token = session.http_conn.headers.get("Posit-Connect-User-Session-Token")

    # Fetch the viewer's credentials from the Connect Server API using the user-session-token
    return client.oauth.get_credentials(user_session_token).get("access_token")
That’s all you need to do to get the identity of the content viewer into your application code! Each platform has its own approach for using this credential to access protected resources. The Connect Cookbook contains complete examples in both Python and R of what this looks like for Databricks and Snowflake to help get you started:
- Databricks Integrations with Python
- Databricks Integrations with R
- Snowflake Integrations with Python
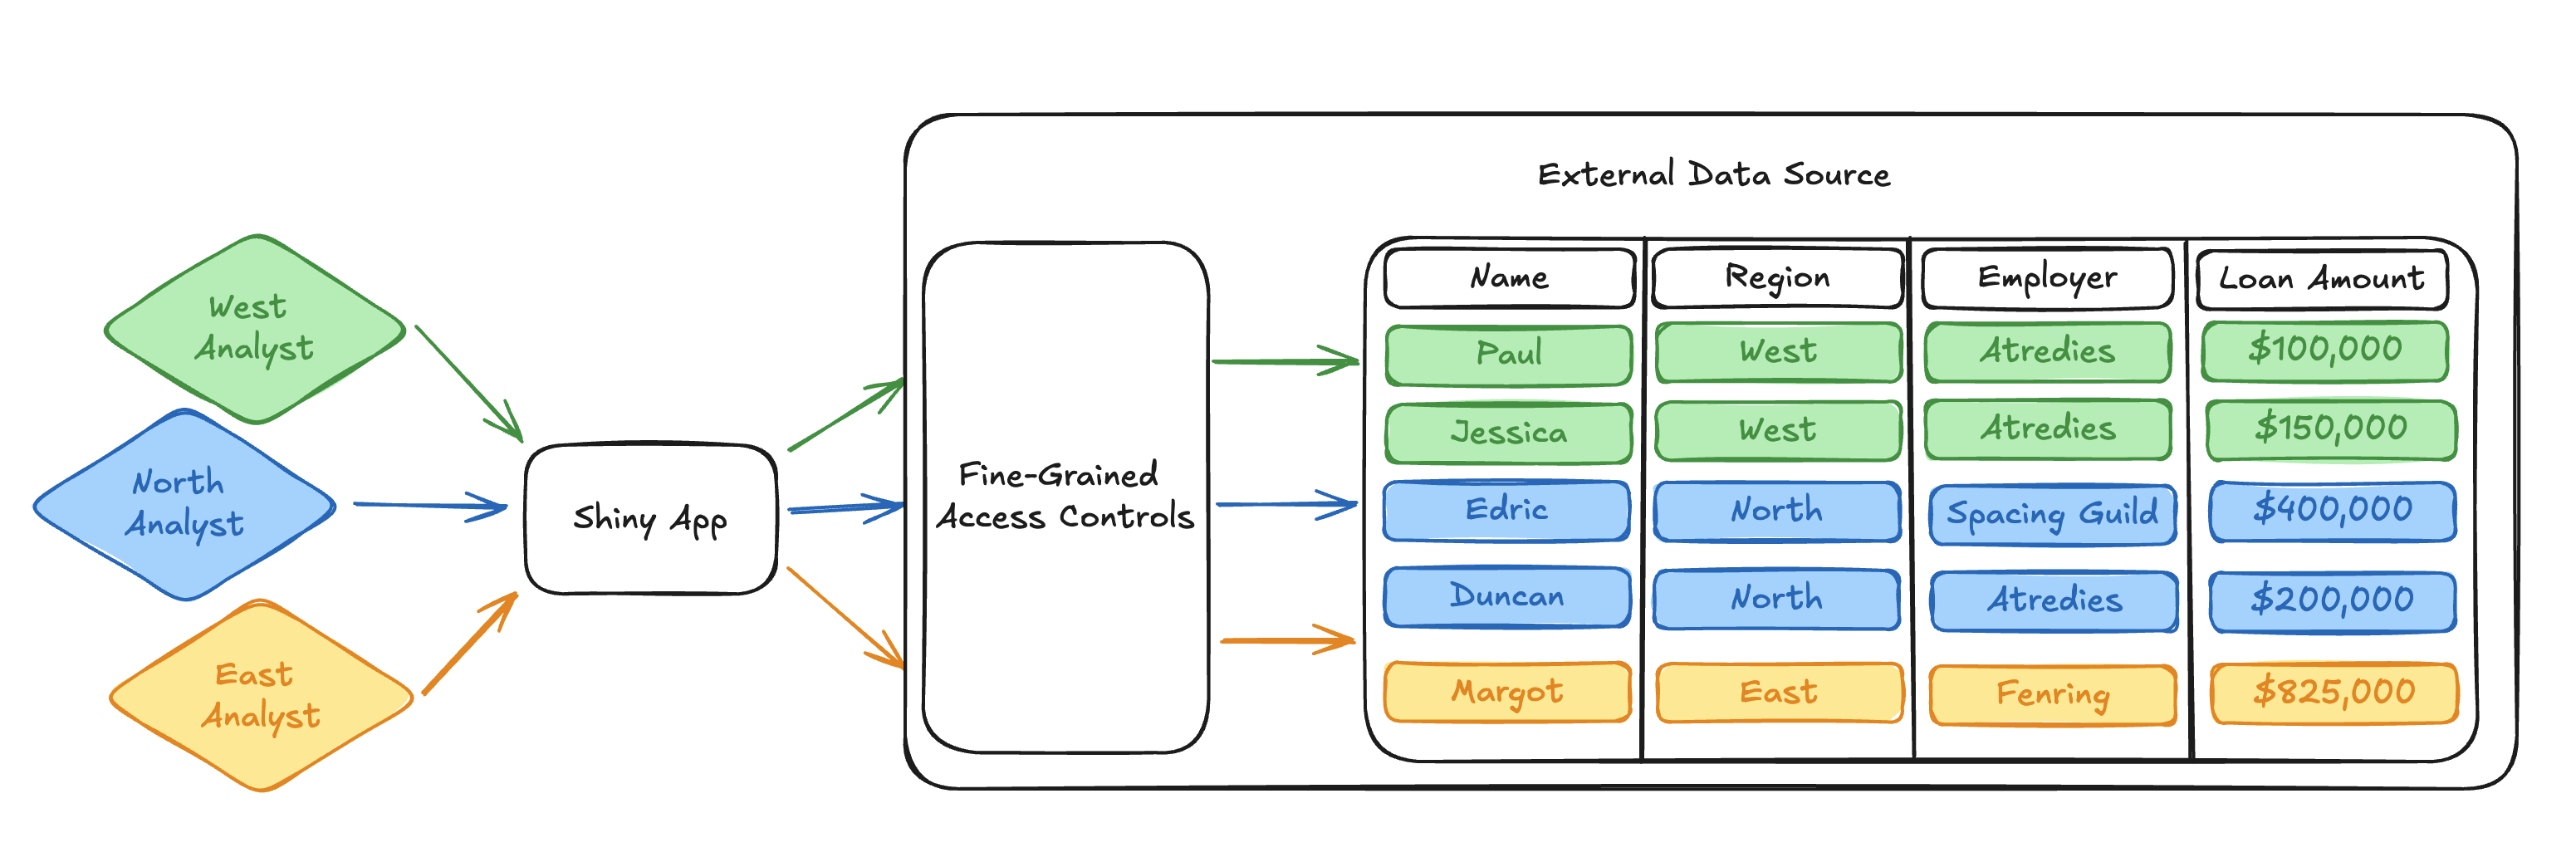
With that, we can expand our loan dataset diagram one last time to show how Connect fits in the picture. Connect handles communication with the external OAuth application and provides the dynamic viewer identity to the published app. The dynamic viewer identity and its interaction with fine-grained access controls in the external data platform are the bread and butter making this workflow possible.
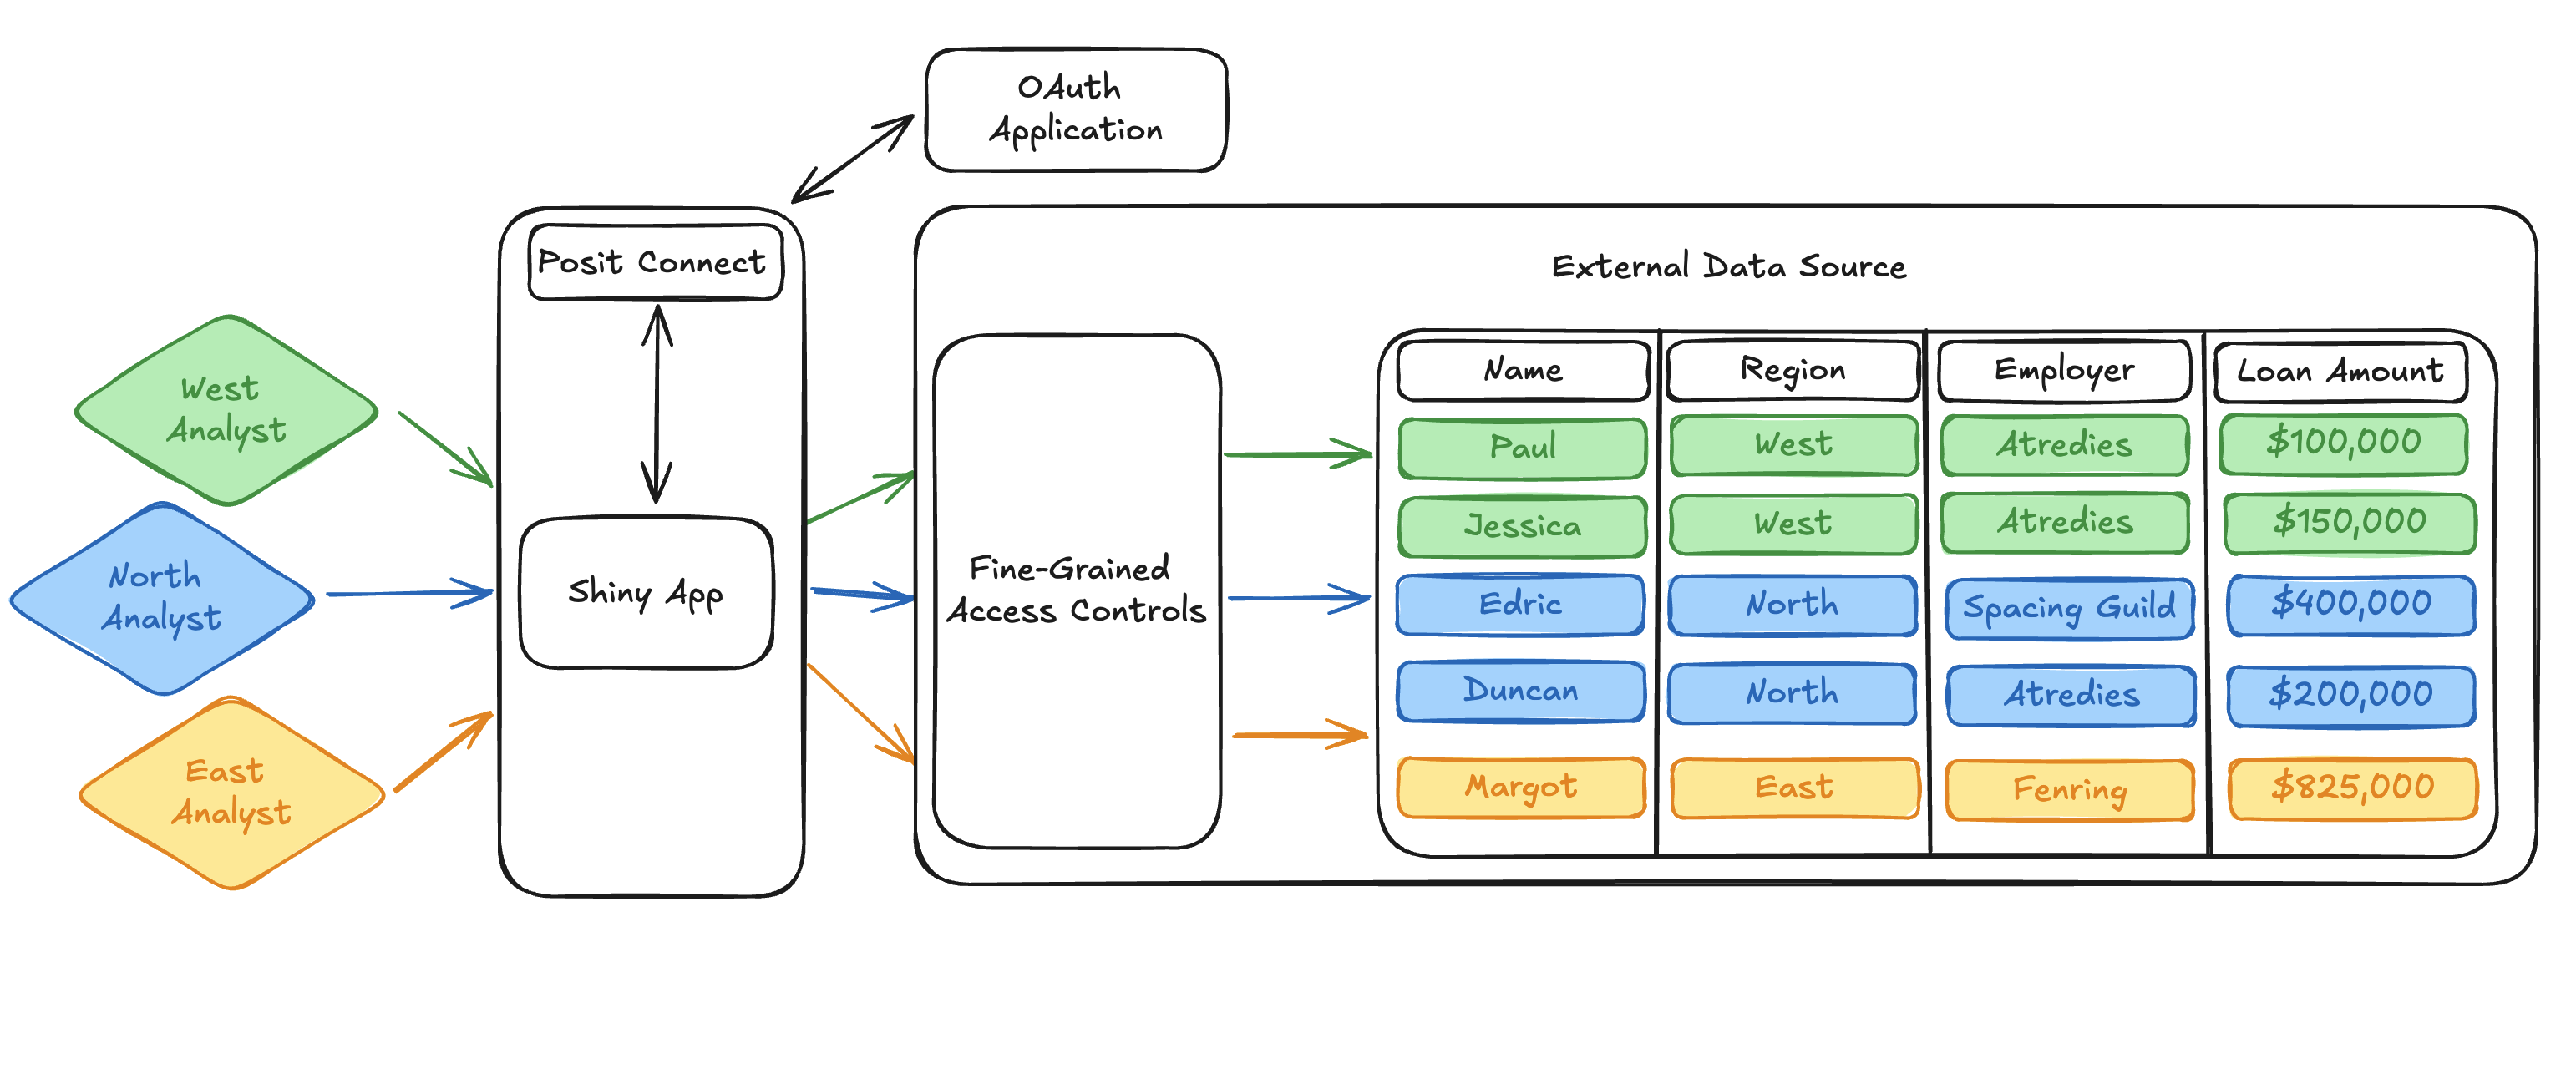
Pretty cool stuff!
Conclusion
I hope this blog post illustrates to you why I’m so excited about this new feature and the new possibilities it opens up for collaborative data science teams. Of course, I skimmed over a bunch of nuance and detail in this simplified walkthrough. If you want to continue learning about OAuth integrations in Posit Connect, the Connect User Guide is a great place to get started.
Thanks for reading!
Footnotes
No comment on additional geographical information. He who controls the loans controls the universe.↩︎
OAuth 2.0 is an industry-standard auth approach with support in many external data platforms (Snowflake and Databricks in particular).↩︎
Related Content

MCP Servers on Connect: Managing credentials and access

Score a Disease Surveillance Model Inside Snowflake, Without Moving
