Machine learning development with Posit Connect and Airflow

This tutorial demonstrates using Posit Connect and Apache Airflow to implement a simple machine learning development lifecycle. Wow, that was a mouthful. Let’s break it down.
Apache Airflow is self-described as “a platform created by the community to programmatically author, schedule, and monitor workflows.” In other words, we can use Apache Airflow to orchestrate custom workflows, including a machine learning development workflow.
A complete machine-learning development workflow encompasses a vast array of operations. For this tutorial, we will concentrate on building an automated pipeline to train a machine learning model.
First, we’ll learn about the dataset and train a simple logistic regression model for classification. Next, we’ll build a Shiny for Python application that applies the model and deploy the application to Posit Connect.
Finally, we’ll refactor our machine learning development workflow for Apache Airflow and automate preparing, training, evaluating, and deploying the model. We’ll also update our application to use the deployed model.
Let’s get started!
Machine Learning Development Workflow
Data exploration
The first step in our machine learning development workflow is data exploration. We’ll use the palmerpenguins dataset for this tutorial.
To begin with, let’s import the penguin dataset from seaborn and understand its shape.
import seaborn as sns

penguins = sns.load_dataset('penguins')
<class 'pandas.DataFrame'>
RangeIndex: 344 entries, 0 to 343
Data columns (total 7 columns):
# Column Non-Null Count Dtype
--- ------ -------------- -----
0 species 344 non-null str
1 island 344 non-null str
2 bill_length_mm 342 non-null float64
3 bill_depth_mm 342 non-null float64
4 flipper_length_mm 342 non-null float64
5 body_mass_g 342 non-null float64
6 sex 333 non-null str
dtypes: float64(4), str(3)
memory usage: 24.9 KBGreat! The data frame contains 344 entries and 7 columns.
Let’s try to build a machine learning model that correctly determines the species using other information available in the dataset. The species column contains three unique values: Adelie, Chinstrap, and Gentoo. For simplicity, let’s use the four numerical columns as features in our dataset: bill_length_mm, bill_depth_mm, flipper_length_mm, and body_mass_g.
Tip
To learn more about this dataset, check out “Introduction to palmerpenguins”.
Data preparation
Next, let’s prepare the dataset for model training. We need to remove NaN values from the data frame and apply a LabelEncoder to the species column.
penguins = penguins.dropna()The LabelEncoder maps str type values in the species column to int values.
from sklearn.preprocessing import LabelEncoder

encoder = LabelEncoder()
penguins["species"] = encoder.fit_transform(penguins["species"])
Next, extract the relevant features and target values into a conventional X and y data frame.
X = penguins[["bill_length_mm", "bill_depth_mm", "flipper_length_mm", "body_mass_g"]]
y = penguins["species"]
Then, split X and y into training and testing sets using a conventional 80%-20% split. We’ll use the test dataset to evaluate the performance of our model.
Note
Setting random_state=0 enforces the same training and testing dataset split on each invocation.
from sklearn.model_selection import train_test_split

X_train, X_test, y_train, y_test = train_test_split(
    X, y, test_size=0.2, random_state=0
)
Model training
Let’s train a simple logistic regression model and evaluate its performance.
To reduce bias among our feature columns, we’ll use a StandardScaler to normalize the distribution.
from sklearn.pipeline import Pipeline
from sklearn.linear_model import LogisticRegression
from sklearn.preprocessing import StandardScaler

pipeline = Pipeline([("scaler", StandardScaler()), ("model", LogisticRegression())])
pipeline = pipeline.fit(X_train, y_train)
Model evaluation
Now that we have trained our model, let’s predict the species of penguins in the X_test dataset. Then, we can compare the predicted values (y_pred) to the correct values (y_test) to understand our model’s performance.
y_pred = pipeline.predict(X_test)Let’s use a confusion matrix to analyze the performance.
from sklearn.metrics import confusion_matrix, ConfusionMatrixDisplay
import matplotlib.pyplot as plt

cm = confusion_matrix(y_test, y_pred)
disp = ConfusionMatrixDisplay(confusion_matrix=cm, display_labels=encoder.classes_)
disp.plot(cmap=plt.cm.Blues)
plt.show()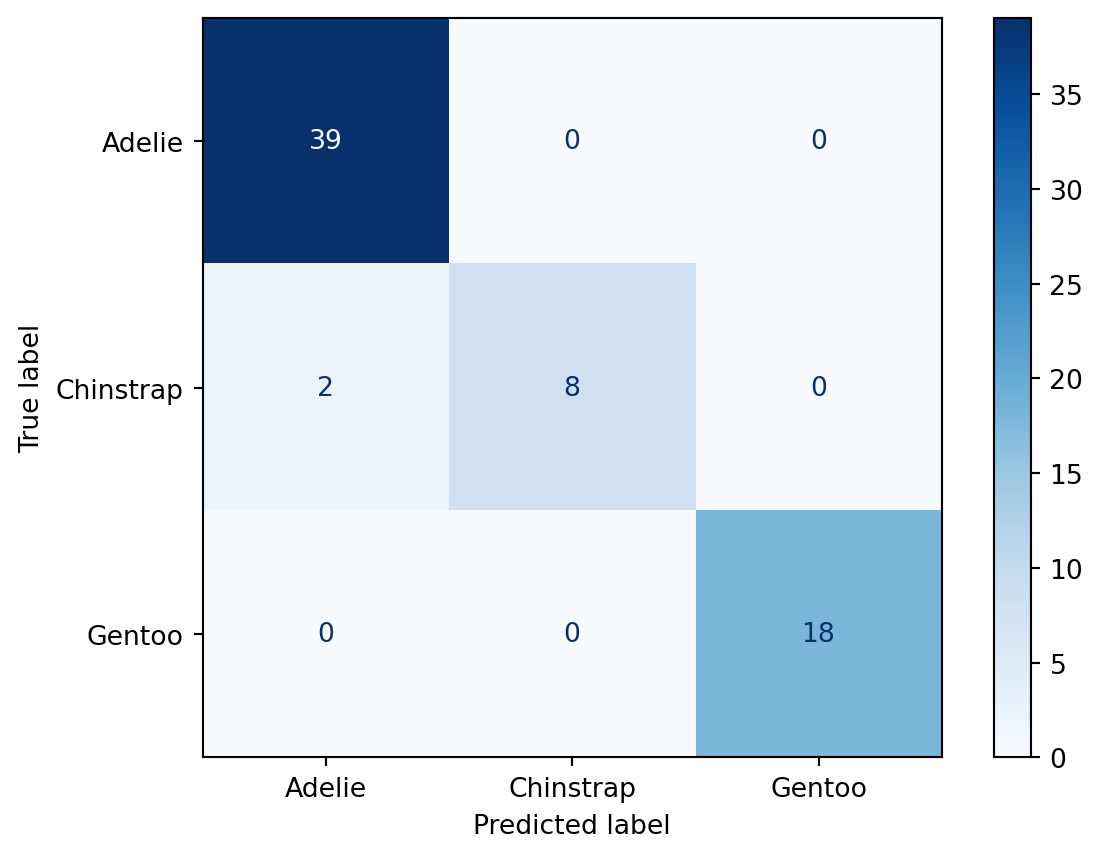
The confusion matrix shows the cross-section of predicted and true classifications. In this example, the model incorrectly classified 2 Chinstrap penguins as Adelie penguins.
Model saving
Finally, let’s write the encoder and pipeline to Connect using pins. For additional information on configuring a board_connect with your credentials, check out the pins documentation.
 import pins

 board = pins.board_connect(allow_pickle_read=True)
 board.pin_write(encoder, name="taylor_steinberg/encoder", type="joblib")
 board.pin_write(pipeline, name="taylor_steinberg/pipeline", type="joblib")
Now that we have trained and deployed our model to Connect, let’s build a Shiny application that infers the penguin species from user-provided input.
Warning
Storing machine learning models as pins works well for small models. But, larger models may require an alternative storage solution. pins supports a variety of storage solutions. Check out the pins documentation to learn more.
Create an application
Let’s create a simple shiny application and publish it on Connect. This example loads the encoder and pipeline. We then collect input from the user and call the pipeline.predict method to determine the species based on the user-provided measurements. Since the prediction produces a numeric value, we use the encoder to convert the numeric value back to the original str representation of the species.
# app.py
import joblib
import pandas as pd
import pins
from shiny.express import input, render, ui

board = pins.board_connect(allow_pickle_read=True)
encoder = board.pin_read("taylor_steinberg/encoder")
pipeline = board.pin_read("taylor_steinberg/pipeline")

with ui.layout_sidebar():
    with ui.sidebar():
        ui.input_slider("bill_length_mm", "Bill Length (mm)", 25, 65, value=45),
        ui.input_slider("bill_depth_mm", "Bill Depth (mm)", 10, 25, value=17),
        ui.input_slider("flipper_length_mm", "Flipper Length (mm)", 160, 240, value=200),
        ui.input_slider("body_mass_g", "Body Mass (g)", 2500, 6500, value=4000),


    @render.text
    def f():
        bill_length_mm = float(input.bill_length_mm())
        bill_depth_mm = float(input.bill_depth_mm())
        flipper_length_mm = float(input.flipper_length_mm())
        body_mass_g = float(input.body_mass_g())
        df = pd.DataFrame(
            [[bill_length_mm, bill_depth_mm, flipper_length_mm, body_mass_g]],
            columns=["bill_length_mm", "bill_depth_mm", "flipper_length_mm", "body_mass_g"],
        )
        species = pipeline.predict(df)
        species = encoder.inverse_transform(species)
        return f"""
        I think this is a {str(species[0])} penguin.
        """
Start your Shiny application using shiny run app.py. Here’s the application running on my machine. I added to our example to highlight the selected penguin from this image created by Allison Horst!
Let’s publish this application to Connect using the Posit Publisher extension for VSCode and Positron. I named my application “Penguin Predictions”. You can name your application anything you like.
Warning
At the time of writing, the Posit Publisher extension is available as a pre-release. For alternative publishing solutions, see the Posit Connect Documentation.
Airflow
Overview
Now that we have developed an end-to-end machine learning workflow, let’s automate it using Airflow. In this section, we will create an Airflow DAG to automate our machine learning workflow. This DAG is broken down into the following tasks:
We will keep things simple in our example, but here are a few examples of how you can use different eventing scenarios to accommodate your organization’s needs.
- Schedule
- This is the most common event trigger in Airflow. You can use schedules to execute your workflow periodically.
- Example: You want to retrain your model daily using the latest available dataset.
- Tasks
- Monitor another Airflow DAG and start your workflow when it is complete.
- Example: Your dataset is produced by an ETL coordinated in a separate Airflow DAG, and you want to retrain your model once the ETL completes.
- Database Sensors
- Monitor a database table and trigger your workflow based on specific changes or conditions in the table.
- Example: You develop a long-running hyperparameter tuning and cross-validation workflow that writes model scores to a database table. You want to monitor the table and send a Slack notification whenever an improved model is identified.
Data preparation
The first task in our Airflow DAG is to prepare the data. We will load the palmerpenguins dataset, clean it by removing missing values, and encode the species column.
import datetime
import seaborn as sns
from airflow.decorators import dag, task
from sklearn.preprocessing import LabelEncoder

@task
def prepare_data():
    penguins = sns.load_dataset("penguins", cache=False)
    penguins = penguins.dropna()
    encoder = LabelEncoder()
    penguins["species"] = encoder.fit_transform(penguins["species"])
    return {"penguins": penguins, "encoder": encoder}
Model training
Next, we will train a logistic regression model using the prepared data. We will split the data into training and testing sets, create a pipeline with a standard scaler and logistic regression model, and fit the model.
from sklearn.model_selection import train_test_split
from sklearn.pipeline import Pipeline
from sklearn.linear_model import LogisticRegression
from sklearn.preprocessing import StandardScaler

@task
def train_model(data):
    penguins = data["penguins"]
    encoder = data["encoder"]
    X = penguins[
        ["bill_length_mm", "bill_depth_mm", "flipper_length_mm", "body_mass_g"]
    ]
    y = penguins["species"]
    X_train, X_test, y_train, y_test = train_test_split(
        X, y, test_size=0.2, random_state=0
    )
    pipeline = Pipeline([("scaler", StandardScaler()), ("model", LogisticRegression())])
    pipeline.fit(X_train, y_train)
    return {"pipeline": pipeline, "encoder": encoder, "X_test": X_test, "y_test": y_test}
Model evaluation
The next task evaluates the trained model by calculating its accuracy score on the test set. The task returns True if the model exceeds a 90% accuracy score.
from sklearn.metrics import accuracy_score

@task
def evaluate_model(data):
    pipeline = data["pipeline"]
    X_test = data["X_test"]
    y_test = data["y_test"]
    score = pipeline.score(X_test, y_test)
    print(f"Model score: {score}")
    if score < 0.9:
        print("Model score does not meet 90% threshold")
        return False
    print("Model score meets 90% threshold")
    return True
Model deployment
When evaulate_model task returns True, we will deploy the pipeline and encoder to Posit Connect using the pins package.
import pins

CONNECT_SERVER = Variable.get("CONNECT_SERVER")
CONNECT_API_KEY = Variable.get("CONNECT_API_KEY")
CONNECT_USER_NAME = "USER_NAME"

@task
def deploy_model(data, is_valid):
    if not is_valid:
        print("Skipping deployment")
        return False
    print("Deploying model")
    encoder = data["encoder"]
    pipeline = data["pipeline"]
    board = pins.board_connect(CONNECT_SERVER, api_key=CONNECT_API_KEY, cache=None, allow_pickle_read=True)
    board = pins.board_connect(allow_pickle_read=True)
    board.pin_write(encoder, name=f"{CONNECT_USER_NAME}/encoder", type="joblib")
    board.pin_write(pipeline, name=f"{CONNECT_USER_NAME}/pipeline", type="joblib")
    return True
Application restart
Finally, when the model is deployed successfully, we’ll restart our Shiny for Python application already deployed to Connect. This will force anyone viewing the application on Connect to refresh their session so that the latest model is used.
from posit import connect

CONNECT_CONTENT_GUID = "CONTENT_GUID"

@task
def restart_app(is_deployed):
    if not is_deployed:
        print("Skipping restart")
        return
    client = connect.Client(CONNECT_SERVER, CONNECT_API_KEY)
    content = client.content.get(CONNECT_CONTENT_GUID)
    print(f"Restarting {content.dashboard_url}")
    content.restart()
Defining the DAG
Now, we will define our Airflow DAG to include all the tasks we created. The DAG will run daily and execute each task in sequence.
@dag(catchup=False, start_date=datetime.datetime(2021, 1, 1), schedule="@daily")
def penguins_dag():
    data = prepare_data()
    model_data = train_model(data)
    is_valid = evaluate_model(model_data)
    is_deployed = deploy_model(model_data, is_valid)
    restart_app(is_deployed)
Full example
import datetime

import pins
import seaborn as sns
from airflow.decorators import dag, task
from airflow.models import Variable
from posit import connect
from sklearn.linear_model import LogisticRegression
from sklearn.model_selection import train_test_split
from sklearn.pipeline import Pipeline
from sklearn.preprocessing import LabelEncoder, StandardScaler

CONNECT_SERVER = Variable.get("CONNECT_SERVER")
CONNECT_API_KEY = Variable.get("CONNECT_API_KEY")
CONNECT_USER_NAME = "USER_NAME"
CONNECT_CONTENT_GUID = "CONTENT_GUID"


@task
def prepare_data():
    penguins = sns.load_dataset("penguins", cache=False)
    penguins = penguins.dropna()
    encoder = LabelEncoder()
    penguins["species"] = encoder.fit_transform(penguins["species"])
    return {"penguins": penguins, "encoder": encoder}


@task
def train_model(data):
    penguins = data["penguins"]
    encoder = data["encoder"]
    X = penguins[
        ["bill_length_mm", "bill_depth_mm", "flipper_length_mm", "body_mass_g"]
    ]
    y = penguins["species"]
    X_train, X_test, y_train, y_test = train_test_split(
        X, y, test_size=0.2, random_state=0
    )
    pipeline = Pipeline([("scaler", StandardScaler()), ("model", LogisticRegression())])
    pipeline.fit(X_train, y_train)
    return {"pipeline": pipeline, "encoder": encoder, "X_test": X_test, "y_test": y_test}


@task
def evaluate_model(data):
    pipeline = data["pipeline"]
    X_test = data["X_test"]
    y_test = data["y_test"]
    score = pipeline.score(X_test, y_test)
    print(f"Model score: {score}")
    if score < 0.9:
        print("Model score does not meet 90% threshold")
        return False
    print("Model score meets 90% threshold")
    return True


@task
def deploy_model(data, is_valid):
    if not is_valid:
        print("Skipping deployment")
        return False
    print("Deploying model")
    encoder = data["encoder"]
    pipeline = data["pipeline"]
    board = pins.board_connect(CONNECT_SERVER, api_key=CONNECT_API_KEY, cache=None, allow_pickle_read=True)
    board.pin_write(encoder, name=f"{CONNECT_USER_NAME}/encoder", type="joblib")
    board.pin_write(pipeline, name=f"{CONNECT_USER_NAME}/pipeline", type="joblib")
    return True


@task
def restart_app(is_deployed):
    if not is_deployed:
        print("Skipping restart")
        return
    client = connect.Client(CONNECT_SERVER, CONNECT_API_KEY)
    content = client.content.get(CONNECT_CONTENT_GUID)
    print(f"Restarting {content.dashboard_url}")
    content.restart()


@dag(catchup=False, start_date=datetime.datetime(2021, 1, 1), schedule="@daily")
def penguins_dag():
    data = prepare_data()
    model_data = train_model(data)
    is_valid = evaluate_model(model_data)
    is_deployed = deploy_model(model_data, is_valid)
    restart_app(is_deployed)


penguins_dag()
Conclusion
This tutorial explores implementing a machine learning development lifecycle using Posit Connect and Apache Airflow. You can orchestrate your machine learning workflows, from data exploration to model training and deployment, leveraging Airflow’s scheduling capabilities for automation and integration. Use this approach to scale your machine learning development and provide meaningful insights to your organization using Posit Connect. Happy coding!
Penguin art by Allison Horst.
Related Content

MCP Servers on Connect: Managing credentials and access

Score a Disease Surveillance Model Inside Snowflake, Without Moving
