Create a Shiny app that interacts with a database


Introduction
In a previous blog post, we explained how to connect to a database from R and Python and manipulate tables using DuckDB, Databricks, and Snowflake as examples. But what if you want to connect to a database from a Shiny app?
In this blog post, we’ll cover how to connect to, read from, and write to a database from a Shiny app in both R and Python. We’ll use the example of an app that reads from a database table, visualizes the data, and allows the user to flag suspicious values and write back to the database.
You can explore these example apps on Posit Connect Cloud: R app, Python app.
Tip
New to Shiny? Take a look at the Shiny for R and Shiny for Python websites.
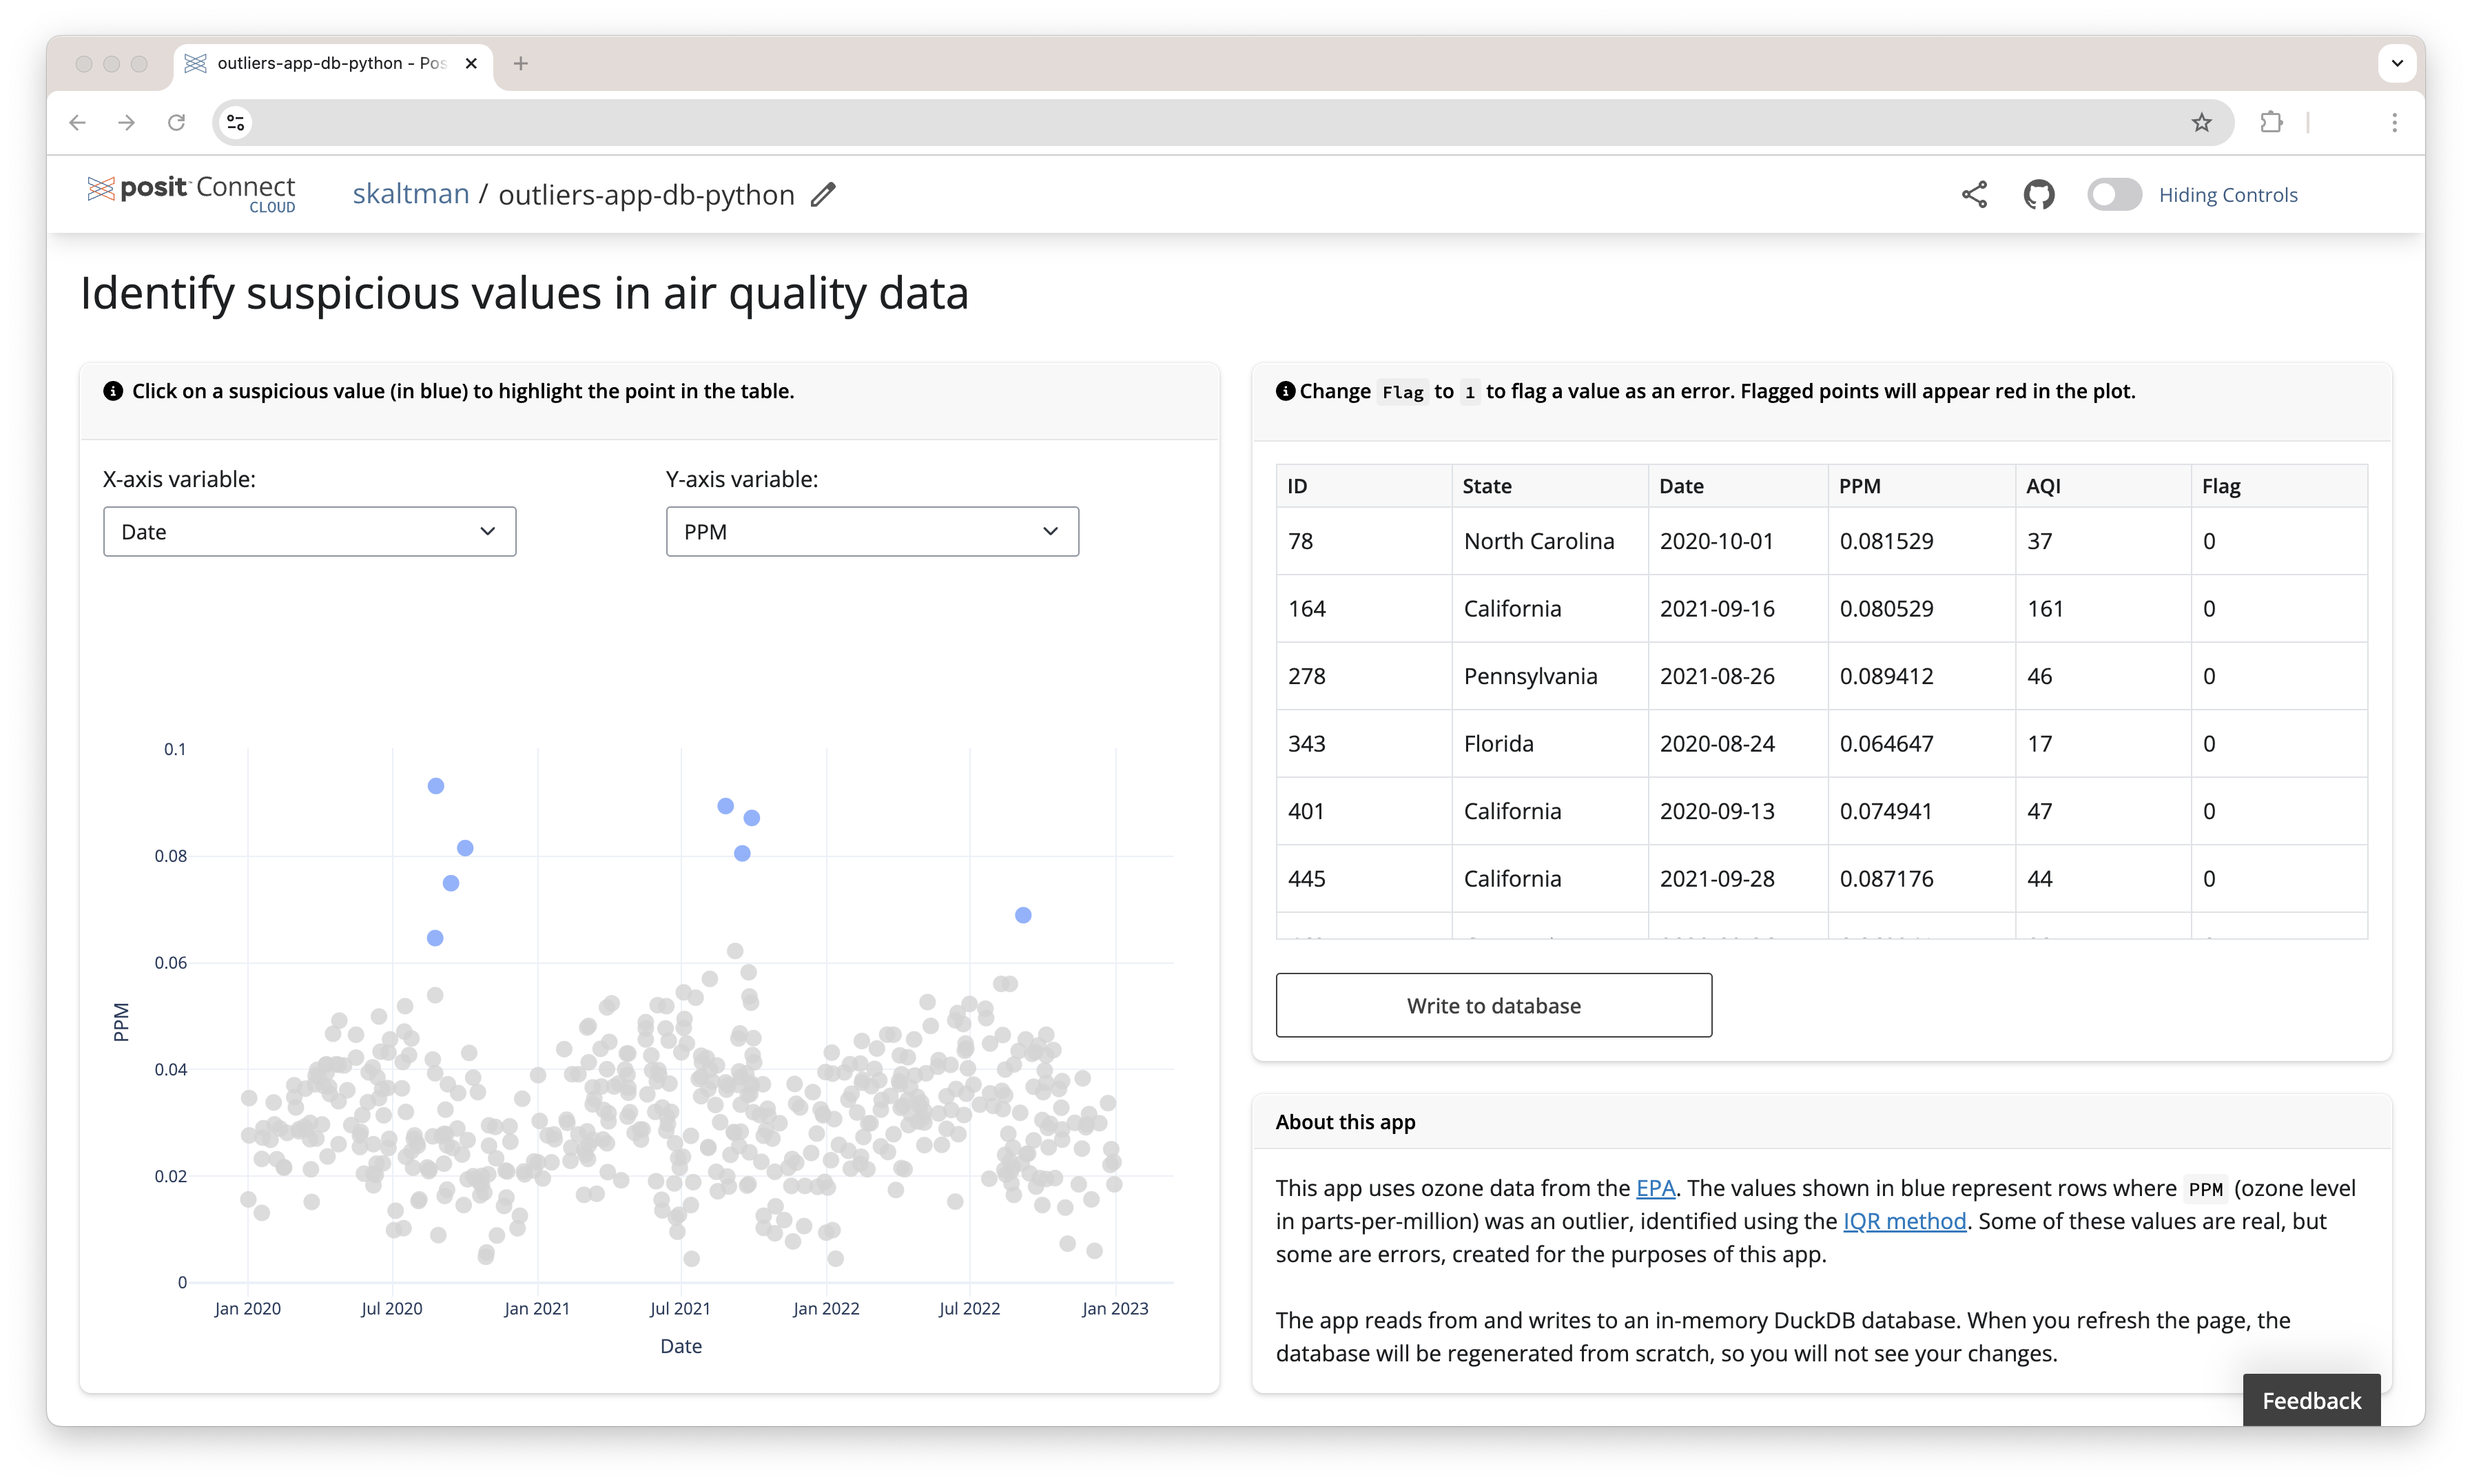
Example: Shiny app that flags outliers
The example app identifies suspicious values in a dataset. The app reads data from a database table (ozone, which contains data on ozone concentrations in air) and visualizes the data, allowing the user to visually identify suspicious values. If you find a value that might be an error, you can add a flag to the corresponding row and write the flagged values back to the database. An app like this allows you, or another user, to look at the data later and further inspect the possible erroneous values.
Note
The example linked above uses an in-memory DuckDB database. For the purposes of the example, the database is rebuilt each session so that different readers of this article do not overwrite each other’s changes. If you were creating this app for your own database, you would likely want persistent storage so that the flagged values persist across sessions and users.
To allow the user to edit the flags, the apps use editable tables. The Python version uses an editable DataTable and the R version uses an editable DT table.
You can see the code for the apps here: R app, Python app.
Read from a database
To read from the database, you’ll first need to connect to the database. This code is similar to connection code written outside a Shiny app. Our example apps use a DuckDB database, so we’ll walk through the process for DuckDB and then explain how to adapt the code for Databricks and Snowflake.
As explained in this post, you can use DBI::dbConnect() and an ODBC driver to connect to many different database management systems. Here’s the relevant code from our app, which we put inside the server() function:
server <- function(input, output, session) {

  con <- dbConnect(duckdb::duckdb(), dbdir = ":memory:")

  ozone <- dplyr::tbl(con, "ozone")

  ...
}
See the code in the context of the app here.
Note
As explained above, our example app uses an in-memory database so that different users don’t overwrite each others’ changes. If you are using an existing, persistent DuckDB database, supply dbConnect()’s dbdir with a path to that database.
The code for Snowflake and Databricks will look similar, following the same common pattern outlined here.
Snowflake
As explained in the previous post, if you’re using the Snowflake Native Posit Workbench App, you don’t need to manually provide any credentials to DBI::dbConnect(). You only need to supply dbConnect() with the relevant warehouse, database, and schema arguments.
server <- function(input, output, session) {
  con <-
    DBI::dbConnect(
      drv = odbc::snowflake(),
      warehouse = "DEFAULT_WH",
      database = "AIR_QUALITY",
      schema = "PUBLIC"
    )

  ozone <-
    dplyr::tbl(con, "OZONE")

  ...
}
If you are not using the Snowflake native app, you’ll need to both pass credentials to DBI::dbConnect() (see the final section about deploying your app).
Databricks
For Databricks, we’ll use sparklyr::spark_connect() to create a Spark connection.
If you’re using the Posit Workbench Databricks Integration, you only need to supply a cluster_id. All other necessary credentials are handled by the integration. If you are not using the Posit Workbench Databricks integration, you will need to handle the credentials yourself.
server <- function(input, output, session) {
  con <- spark_connect(
    cluster_id = "[my_cluster_id]",
    method = "databricks_connect",
    version = "14.0"
  )

  ozone <-
    dplyr::tbl(
      con,
      in_catalog("demos", "default", table = "ozone_outliers")
    )

  ...
}
In Python, we use Ibis to connect to the database, just as we did here. Since our app uses Shiny Express, it does not require a server() function.
con = ibis.duckdb.connect(database="data/ozone.duckdb")
ozone = con.table("ozone")
See the code in the context of the app here.
Note
Again, our actual app uses an in-memory DuckDB database, and so creates and connects to the database using con = ibis.duckdb.connect(database=':memory:'). If using a persistent database, supply the path to the existing database, as we did above.
The code for an app that uses Snowflake or Databricks is similar. We just need to swap in the corresponding Ibis backend and pass connect() the details necessary to identify the table.
Snowflake
If you’re using the Posit Workbench Snowflake Native App, you only need to supply the warehouse, database, and catalog and set connection_name to "workbench".
con = ibis.snowflake.connect(
  warehouse="DEFAULT_WH",
  database="AIR_QUALITY",
  catalog="PUBLIC",
  connection_name="workbench"
)

ozone = con.table("ozone")
Databricks
For Databricks, we use Ibis’s PySpark backend and then use databricks.connect and databricks.core to create a SparkSession. See the “Databricks” section of the previously mentioned blog post for more details.
config = Config(profile="workbench", cluster_id=[Cluster ID])
session = DatabricksSession.builder.sdkConfig(config).getOrCreate()

con = ibis.pyspark.connect(session=session)
ozone = con.table("demos.air_quality.ozone")
Write back to the database
Our app writes back to the database when the user clicks an action button. The app can only change the flag column and only updates the flag values changed by the user.
Below is the code that writes back to the database from our app, in R and Python. You can see all the code that controls when and how the apps changes values in the database starting here for the R app and here for the Python app.
We used the DBI function dbExecute() to write back to the database. dbExecute() takes a connection and a SQL string and then executes the provided SQL. Since we want to update an existing table, we’ll use an UPDATE statement. To create the SQL string, we use glue::glue() to combine the UPDATE syntax with the correct flag and id values. The code below is from our DuckDB example app.
walk2(
  rows_changed$flag_new,
  rows_changed$id,
  \(x, y)
    dbExecute(
      con,
      glue::glue("UPDATE ozone SET flag = {x} WHERE id = {y}")
    )
)
Tip
It’s best practice to use a database transaction when writing to a database. The DBI package includes various functions to begin, commit, and rollback transactions. Learn more here.
The code for an app that uses Snowflake is identical. For Databricks, you’ll need to supply the catalog, schema, and table name (in our app, those are demos, default, and ozone_outliers).
walk2(
  rows_changed$flag_new,
  rows_changed$id,
  \(x, y)
    dbExecute(
      con,
      glue::glue("UPDATE demos.default.ozone_outliers SET flag = {x} WHERE id = {y}")
    )
)
In Python, we can use Ibis to write back to the database. Some Ibis backends support updating existing tables (i.e., run UPDATE queries) using .insert(). However, the DuckDB backend does not currently support .insert(), so we will need to write some SQL and then execute it using the Ibis method .raw_sql().
for _, row in rows_to_update.iterrows():
    outliers.loc[outliers['ID'] == row['ID'], 'Flag'] = row['Flag_new']

    sql_query = f"UPDATE ozone SET flag = '{row['Flag_new']}' WHERE id = '{row['ID']}'"

    con.raw_sql(sql_query)
The code for an app that uses Snowflake is identical. For Databricks, you’ll need to supply the catalog, schema, and table name (in our app, those are demos, default, and ozone_outliers).
Deploy your Shiny app
After you’ve created your Shiny app, the next step is to deploy it so others can use it. Two options are Posit Connect Cloud and Posit Connect. If you’re deploying an app that connects to Databricks or Snowflake, we recommend using Posit Connect, if you have access, to take advantage of OAuth authentication (see explanation below).
Deploying to Posit Connect vs. Posit Connect Cloud
Posit Connect is an enterprise solution where organizations manage deployments within a controlled environment. Posit Connect Cloud (currently in alpha) is available to anyone, allowing easy deployment from public GitHub repositories without managing infrastructure.
When deploying an app that interacts with a database, managing access is crucial. Here are a few strategies to handle database permissions:
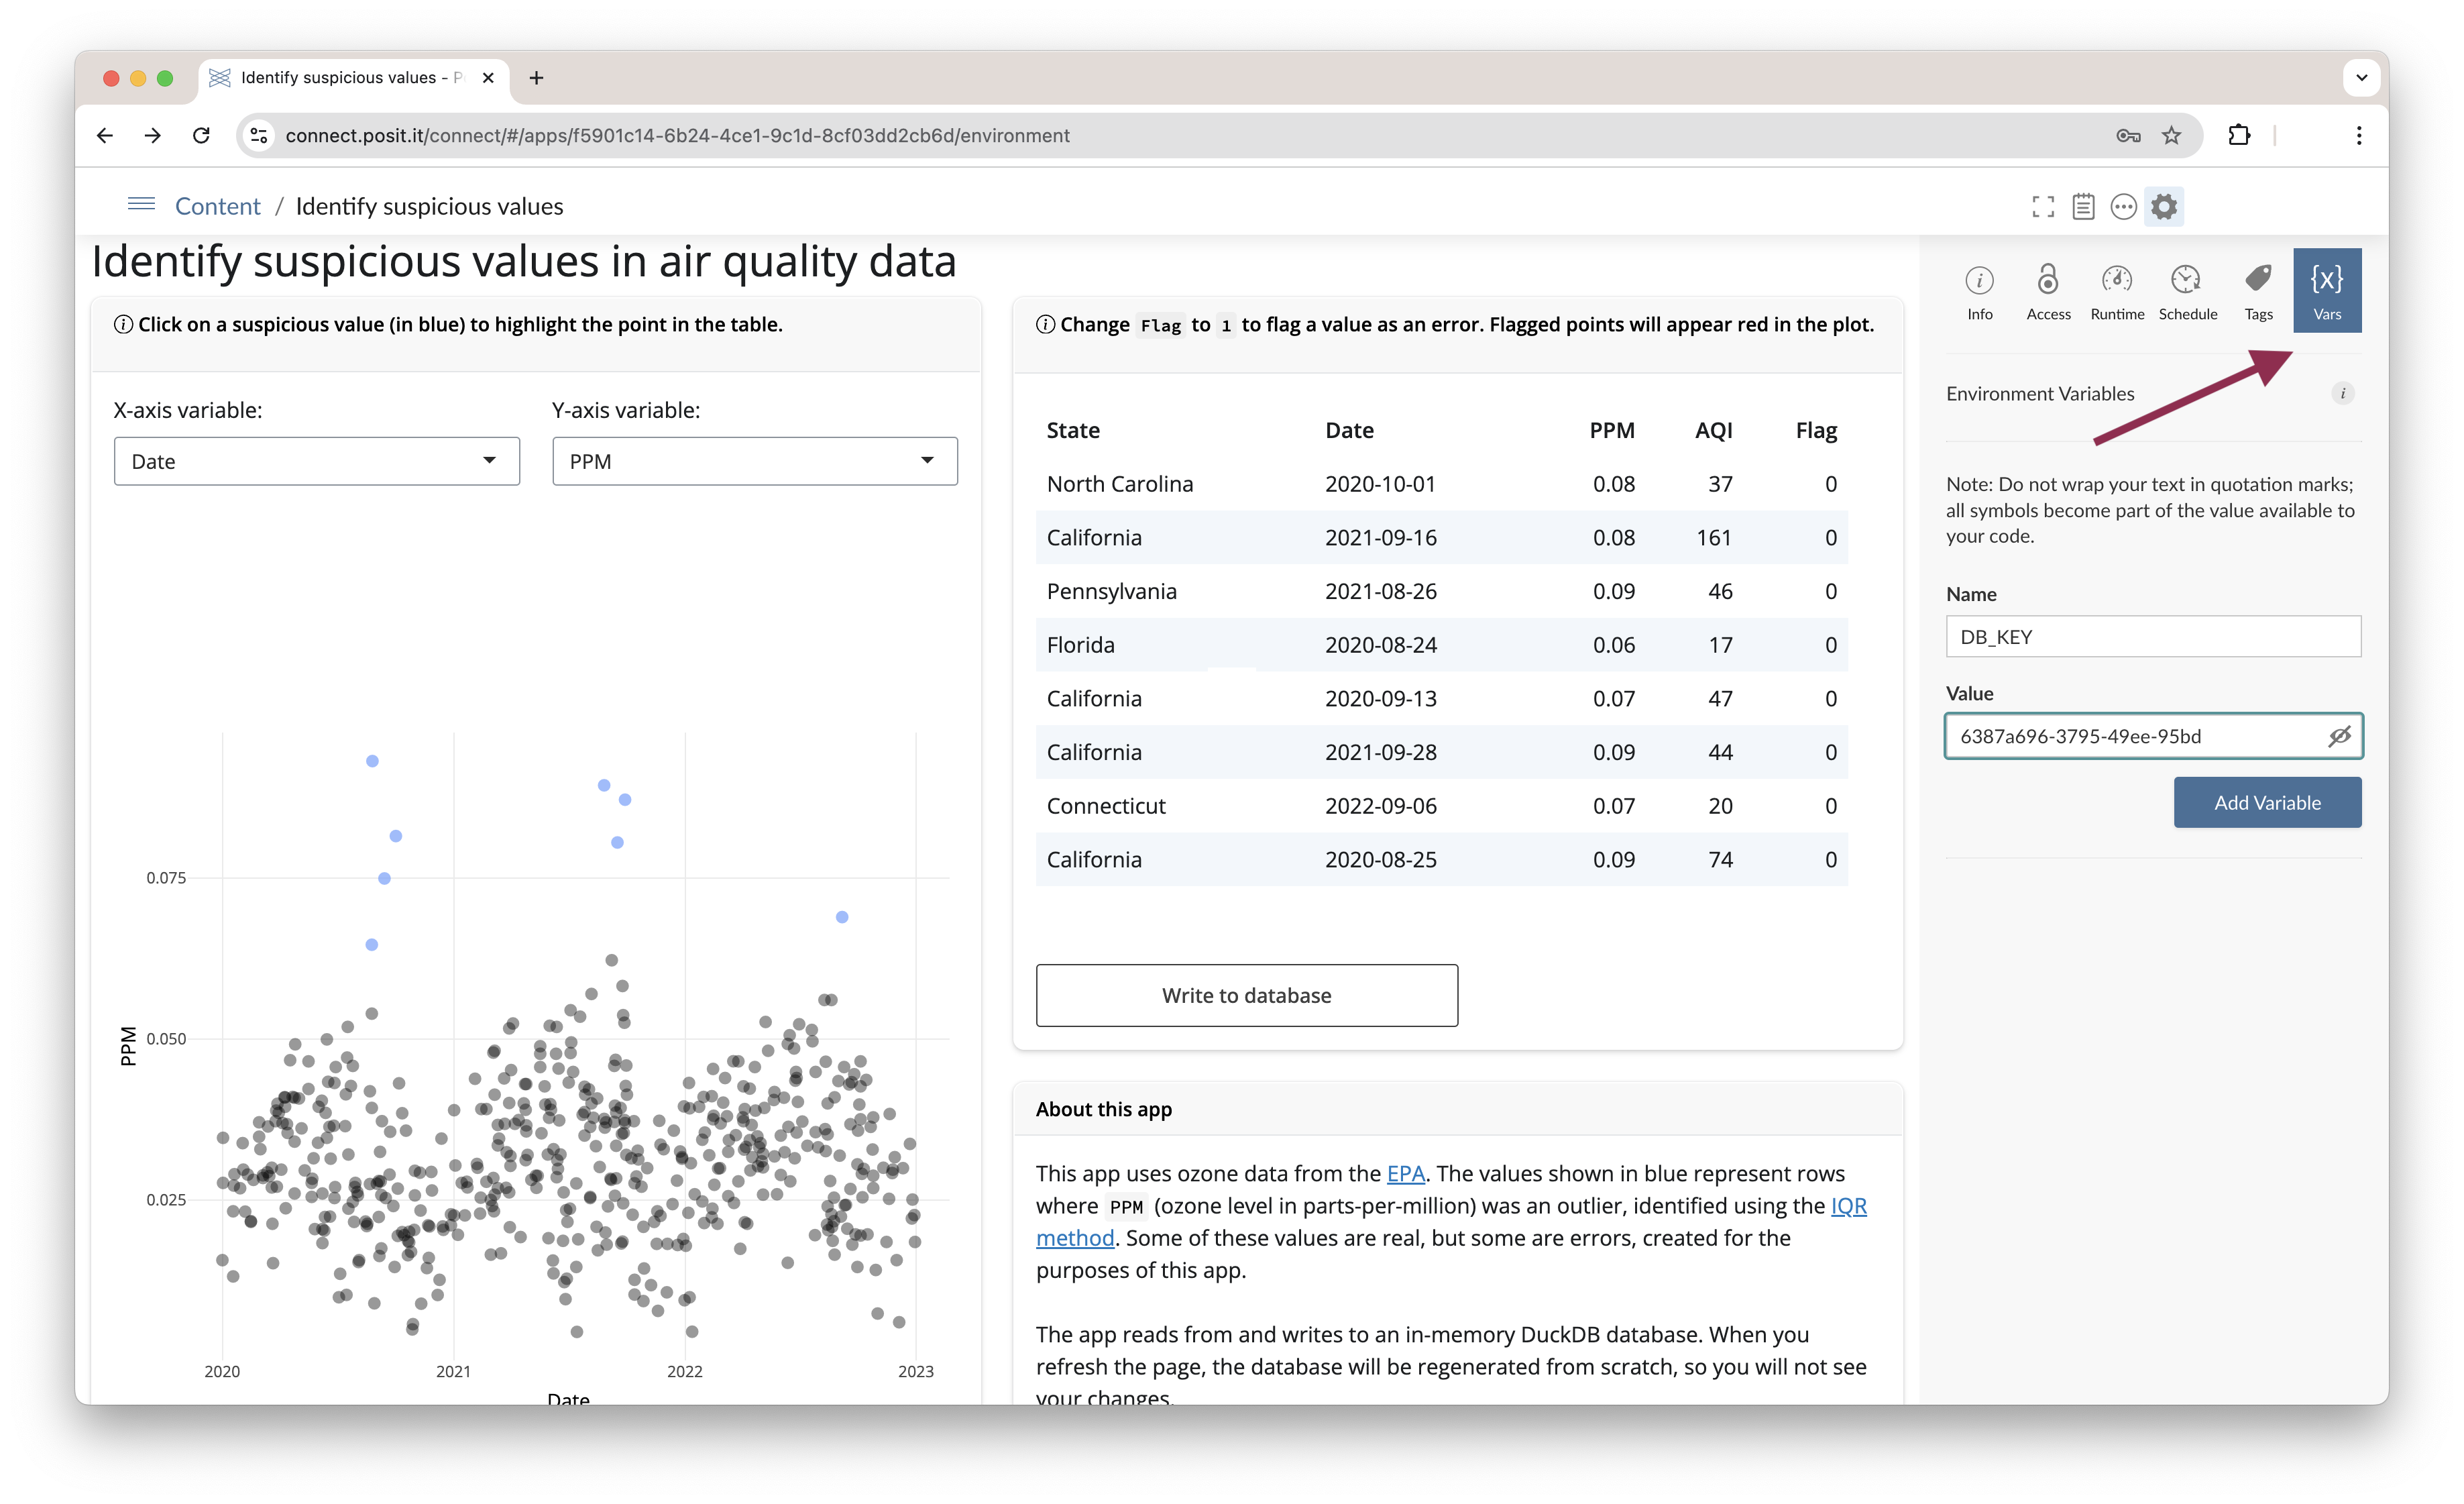
Strategy 1: Environment variables. One approach to securely manage database credentials is to store your connection credentials (e.g., username, password) as environment variables where the app is deployed. Your app can access these environment variables using code like Sys.getenv("DB_KEY").
If you deploy to Posit Connect, you can use Connect’s Vars pane to securely set environment variables after deploying your app. Posit Connect will automatically provide the correct values to your app during runtime.
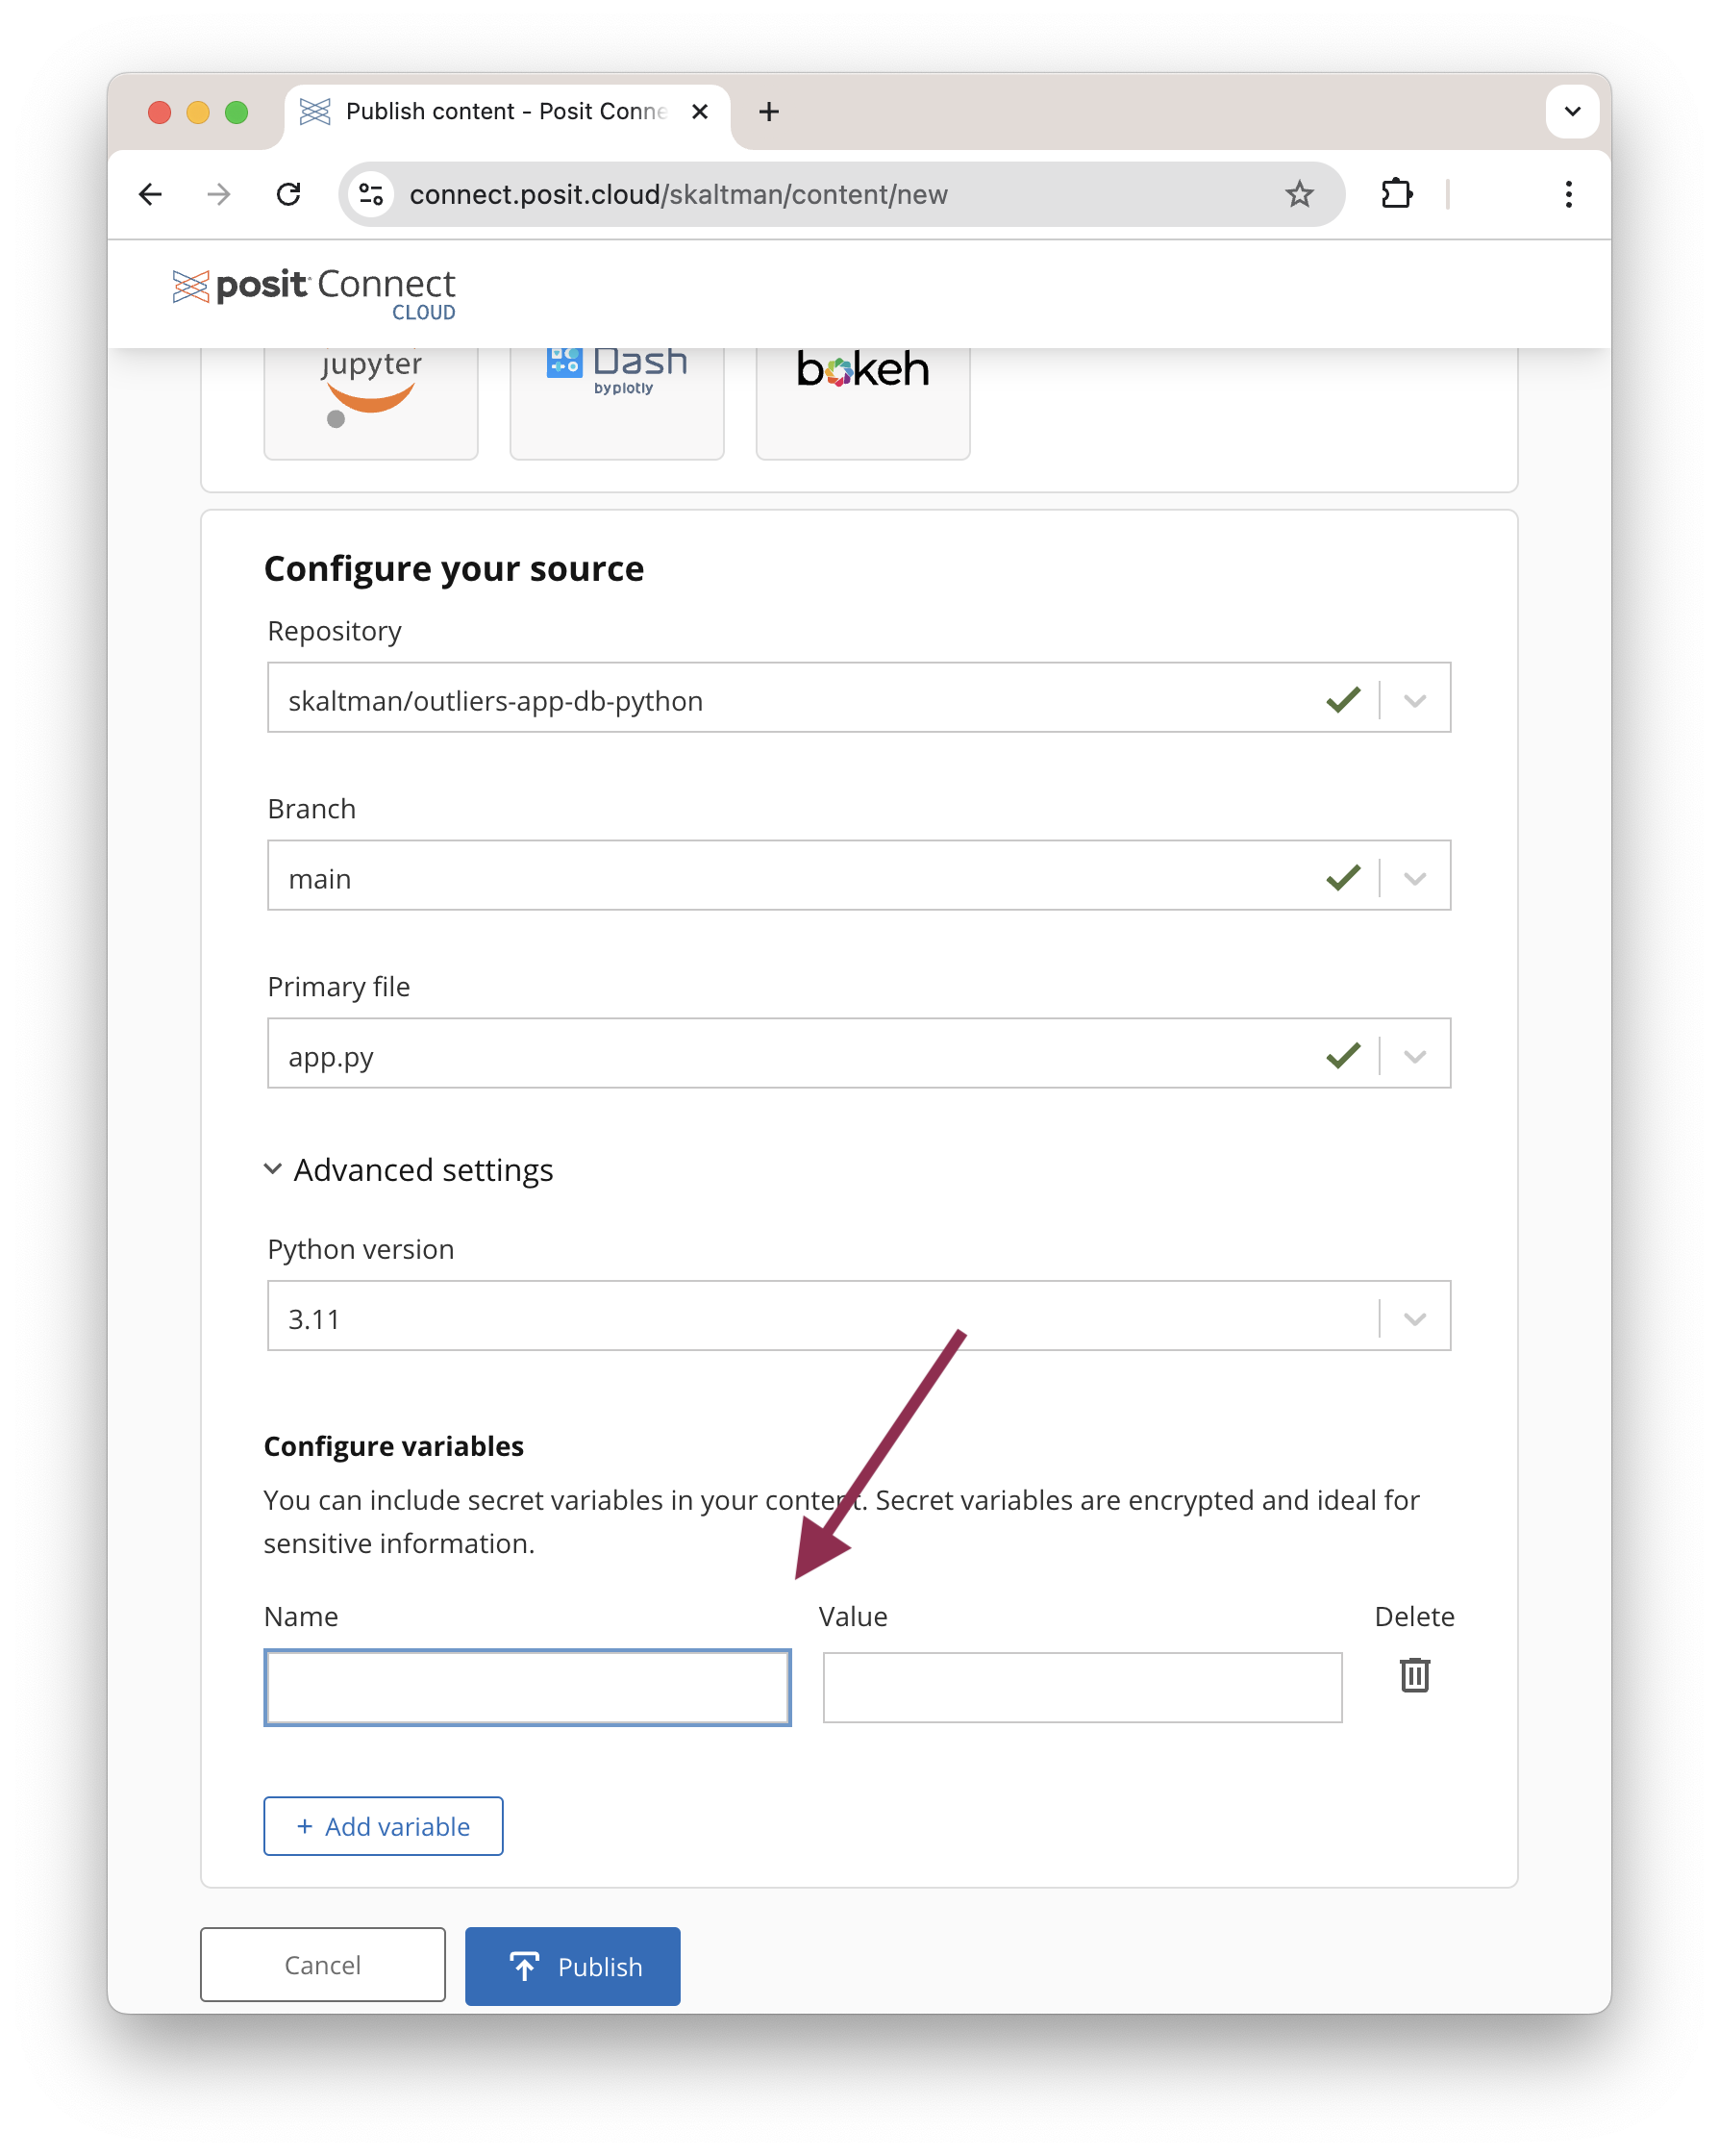
Similarly, with Posit Connect Cloud, you can configure secret variables during deployment.
Other deployment platforms offer similar features for securely managing environment variables.
For enhanced security, consider using the credentials to a service account with predefined permissions. This allows your app to authenticate to the database without relying on individual user’s credentials.
Strategy 2: User authentication. In some cases, you may want each user to connect to the database with their own credentials, especially if your database includes row-level or data-level permissions. Posit Connect includes Databricks and Snowflake OAuth integrations, allowing users to log in with their own accounts. With OAuth integration, you don’t need to specify the database credentials used in your app. Instead, users authenticate through the OAuth integration, and Posit Connect automatically handles the connection. Learn more by taking a look at the Posit Connect documentation.
For other database management systems, you can request user credentials and then pass those credentials to the connection code. However, note that this method, depending on its implementation, may not be as secure as the OAuth or environment variable solutions.
Conclusion
Connecting a Shiny app to a database opens up possibilities for data interaction and analysis. Our app uses the simple example of flagging suspicious values. You can extend this framework—reading data, displaying it in an app, and allowing users to write back to the database—to other use cases, such as labeling images when training an image recognition system.
Learn more
Take a look at the following resources if you’d like to explore these topics further:
- Shiny for R: Documentation and tutorials for building Shiny apps in R.
- Shiny for Python: Documentation and tutorials for building Shiny apps in Python.
- Securely Deployed Content: Best practices for securely accessing a database in deployed content.
- Pooling Database Connections in R: Efficiently manage database connections in R Shiny apps using the pool package.
- Posit Connect OAuth Integration: Learn how to set up OAuth integrations for secure user authentication in your Shiny apps.
- Using Transactions in DBI: Learn about using transactions when writing to a database in R.

Sara Altman
Related Content

Don't bring a spreadsheet to a data fight

Snowflake Native Apps vs. Connected Apps for financial services
